• Luster dust goes on after the chocolate sets — not before, not during
• Dry dusting with a soft brush gives the cleanest shimmer
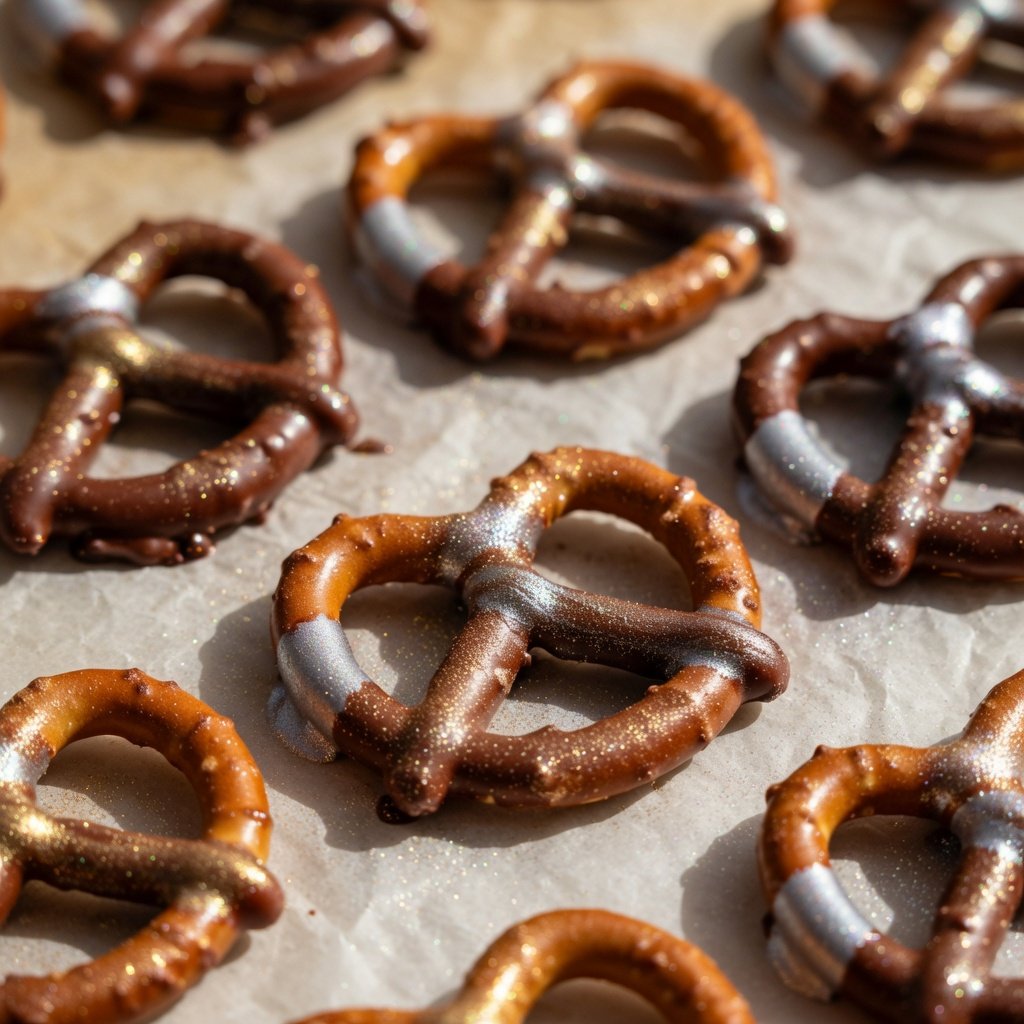
• Gold on dark chocolate, silver on white — both are ridiculous in a good way
• These take about 20 minutes of active work and they look like a bakery charged $4 each
Chocolate covered pretzels are already good. Add luster dust on the chocolate and they look like they belong in a gift box at a hotel checkout counter. Twenty minutes, one bowl, zero special skills required.
Ingredients
Ingredients
- 24 Pretzel rods or snapping pretzels
- 2 cups Chocolate melting wafers or good quality chocolate chips (dark, milk, or white)
- 1 tsp Gold Luster Dust
- 1 tsp Silver Luster Dust
- 1 tsp Red Luster Dust (optional — great for holidays)
- 1 tsp Green Luster Dust (optional — same)
You’ll also need: a microwave-safe bowl, a baking sheet lined with parchment, and a small soft-bristle food brush (a dedicated pastry brush works perfectly).
Instructions
Microwave your chocolate wafers in 30-second intervals, stirring between each one. Usually takes 2-3 rounds. Stop when it’s fully smooth — don’t overheat it or it’ll seize and you’ll have a bad time.
Hold each pretzel by one end and dip it into the chocolate, covering about two-thirds. Let the excess drip off, then lay it on your parchment-lined baking sheet. Do all of them before the chocolate sets.
This is the important part. Let the chocolate harden fully — either at room temperature for 20-30 minutes, or pop the tray in the fridge for 10 minutes. The surface needs to be completely dry before you add luster dust. If it’s still tacky, the dust will absorb into the chocolate instead of sitting on top, and you’ll lose the shimmer.
Dip your brush lightly into the luster dust — you need less than you think. Dust it across the chocolate surface in light, sweeping strokes. One pass is usually enough. Build it up gradually if you want more intensity, but start subtle. For Gold Luster Dust on dark chocolate, one coat is genuinely all you need. Silver Luster Dust on white chocolate hits completely differently — almost mirror-like.
Do all gold, all silver, or split the batch. For holiday batches, Red Luster Dust and Green Luster Dust on white chocolate make a platter that looks like it took way more effort than it did.
Tips
Dark chocolate is the gold standard — literally. The contrast between deep brown and metallic gold or silver is dramatic and it photographs incredibly well. White chocolate works great too, especially with silver or rose gold. Milk chocolate is fine but the shimmer reads a little flatter against it. If you’re making these to impress someone, go dark.
You can, but you won’t get the same effect. Mixing it in gives a subtle metallic tint throughout — which looks cool on molded chocolates but won’t give you that surface shimmer. For pretzels, always dust on top after it sets. That’s where the light-catching magic happens. If you’re new to working with luster dust in general, the beginners’ guide covers both methods.
Room temperature in an airtight container, up to a week. Don’t refrigerate them after dusting — condensation will form on the chocolate surface when they come back to room temp, and it mutes the shimmer. Make them, dust them, store them at room temp. Done.
You Might Also Like

Glitter Rimmed Cocktail Glasses
Same technique, different surface. Get the rim right and everything you pour looks intentional.

Gold Shimmer Champagne Cocktail
Serve these pretzels alongside this and you've got a full gold moment.

Cranberry Glitter Punch
If you're making the holiday red-and-green pretzel batch, this punch belongs on the same table.